Customizing the Inventory Provider
An Inventory Provider is a pluggable component that’s integrated into Ektron's Ektron CMS400.NET eCommerce module. An Inventory Provider handles the retrieving and updating of inventory information for products within the CMS. Out of the Box, the Ektron CMS400.NET comes with a default Ektron Inventory Provider that tracks inventory within the CMS database.
If your business has an Accounting or Enterprise Resource Management solution that manages inventory, you can create a custom Inventory Provider that retrieves and updates inventory information directly from that system. Inventory data can be stored in any number of locations, including databases, ERP or CRM systems, or even XML files.
Inventory Provider Object Model
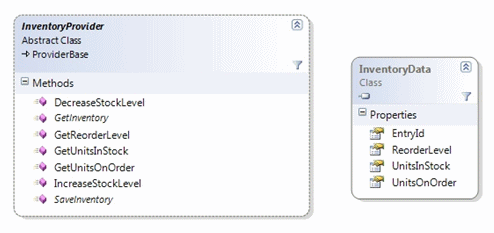
Below is the Object Model for Ektron’s Inventory Provider.

The InventoryProvider is the abstract base class you must extend to implement your own Inventory Provider. Details and descriptions of the InventoryProvider API can be found in the Ektron CMS400.NET API Reference Manual’s Providers API > Inventory > Provider > InventoryProvider.
Creating a Custom Inventory Provider
In addition to the out-of-the-box inventory provider that comes with Ektron CMS400.NET, you can create your own custom provider that connects with an existing inventory system. Below are the basic code steps you need to complete when creating a custom inventory provider. A code example for the inventory provider used by Ektron CMS400.NET is located in:
C:\Program Files\Ektron\CMS400SDK\Commerce\Providers\Commerce.Providers\Inventory
Note: The complete C# code sample used in this example is available at the end of this section. See CustomInventoryProvider Code Example
1. Create a class library project in Visual Studio.
2. Add references to these DLLs:
- Ektron.Cms.Commerce
- Ektron.Cms.Common
- Ektron.Cms.ObjectFactory
- System.Configuration
3. Add these using statements to the code behind.
            using Ektron.Cms.Commerce.Inventory.Provider;
            using Ektron.Cms.Commerce.Data;
            using Ektron.Cms.Commerce;
            using Ektron.Cms.Common;
            using Ektron.Cms.Extensibility;
            using Ektron.Cms.Extensibility.Commerce;
4. Change the namespace to:
         Ektron.Cms.Extensibility.Commerce.Samples
         {
5. Rename your class and inherit as below:
            CustomInventoryProvider
            InventoryPovider
6. Add the following constructor, private variables and properties.
Public CustomInventoryProvider() { } private CmsInventory _inventory;
protected CmsInventory Inventory
     {
             get
     {
            if (_inventory == null)
             {
              _inventory = CmsInventory(RequestInformation);

              {

            return_inventory;
            }
      }
7. Override the following methods. These methods area called when the inventory system is queried.
- GetInventory - returns an InventoryData data class for a given product id.
- SaveInventory - persists updates to the stock levels inside the inventory system.
In this example, we trigger Ektron CMS400.NET extensibility events, such as OnBeforeInventorySave() and OnAfterInventorySave(). In a real world scenario, your existing inventory system may have its own inventory events that are used.
public override InventoryData GetInventory (long entryId)
      {
       return Inventory.GetInventory(entryId);
      }
public override void SaveInventory(InventoryData inventory)
	{
           OnBeforeInventorySave(inventory);
           Inventory.SaveInventory(inventory);
           OnAfterInventorySave(inventory);
if (inventory.UnitsInStock < inventory.ReorderLevel)
        {
               OnInventoryReorderLevelReached(inventory);
         }

       }
   }
}
8. Save and build the project.
9. Copy your project’s DLL file to your Ektron web site’s bin directory.
10. Register the provider in your site’s Web.config file. The Web.config file provides the facility to manage inventory providers within Ektron CMS400.NET. Locate the InventoryProvider section and change the defaultProvider parameter to the name of your custom provider.
Note: If you start your search from the top of the file, it will be the second instance.
<inventoryProvider defaultProvider="CustomInventoryProvider">
11. Add your custom payment provider between the EktronPaymentGateway’s <providers> tags. Note that the name defined here needs to match the name defined as the defaultProvider in the previous step.**
<providers>
<add name="CustomInventoryProvider"
type="Ektron.Cms.Extensibility.Commerce.Samples.CustomInventoryProvider,
CustomInventoryProvider"/>
</providers>
12. Save the Web.config file.
Your custom inventory provider is now the default provider. Whenever the inventory is queried, the call routes through the new custom provider.
CustomInventoryProvider Code Example
Warning! Copying and pasting the code below and using it without modification to create a DLL does not result in a working “real time” shipping provider. This example uses fixed rates and should be modified to meet your needs.
Below is the full C# code example used in this section. See Also: Creating a Custom Inventory Provider.
                using Ektron.Cms.Commerce.Inventory.Provider;
                using Ektron.Cms.Commerce.Data;
                using Ektron.Cms.Commerce;
                using Ektron.Cms.Common;
                using Ektron.Cms.Extensibility;
                using Ektron.Cms.Extensibility.Commerce;
                namespace Ektron.Cms.Extensibility.Commerce.Samples
                {
                public class CustomInventoryProvider : InventoryProvider
                    {
                public CustomInventoryProvider() { }private CmsInventory _inventory;
                protected CmsInventory Inventory
                        {
                get

                            {
                if (_inventory == null)
                                {
                                    _inventory = new CmsInventory(RequestInformation);
                                }
                return _inventory;
                            }
                        }
                public override InventoryData GetInventory(long entryId)
                        {
                return Inventory.GetInventory(entryId);
                        }
                public override void SaveInventory(InventoryData inventory)
                        {
                            OnBeforeInventorySave(inventory);
                            Inventory.SaveInventory(inventory);
                            OnAfterInventorySave(inventory);
                if (inventory.UnitsInStock < inventory.ReorderLevel)
                            {
                                OnInventoryReorderLevelReached(inventory);
                            }
                        }
                    }
                }
